Features
Semi-Public Access
Allow two levels of interaction: Public and Sign-in Required
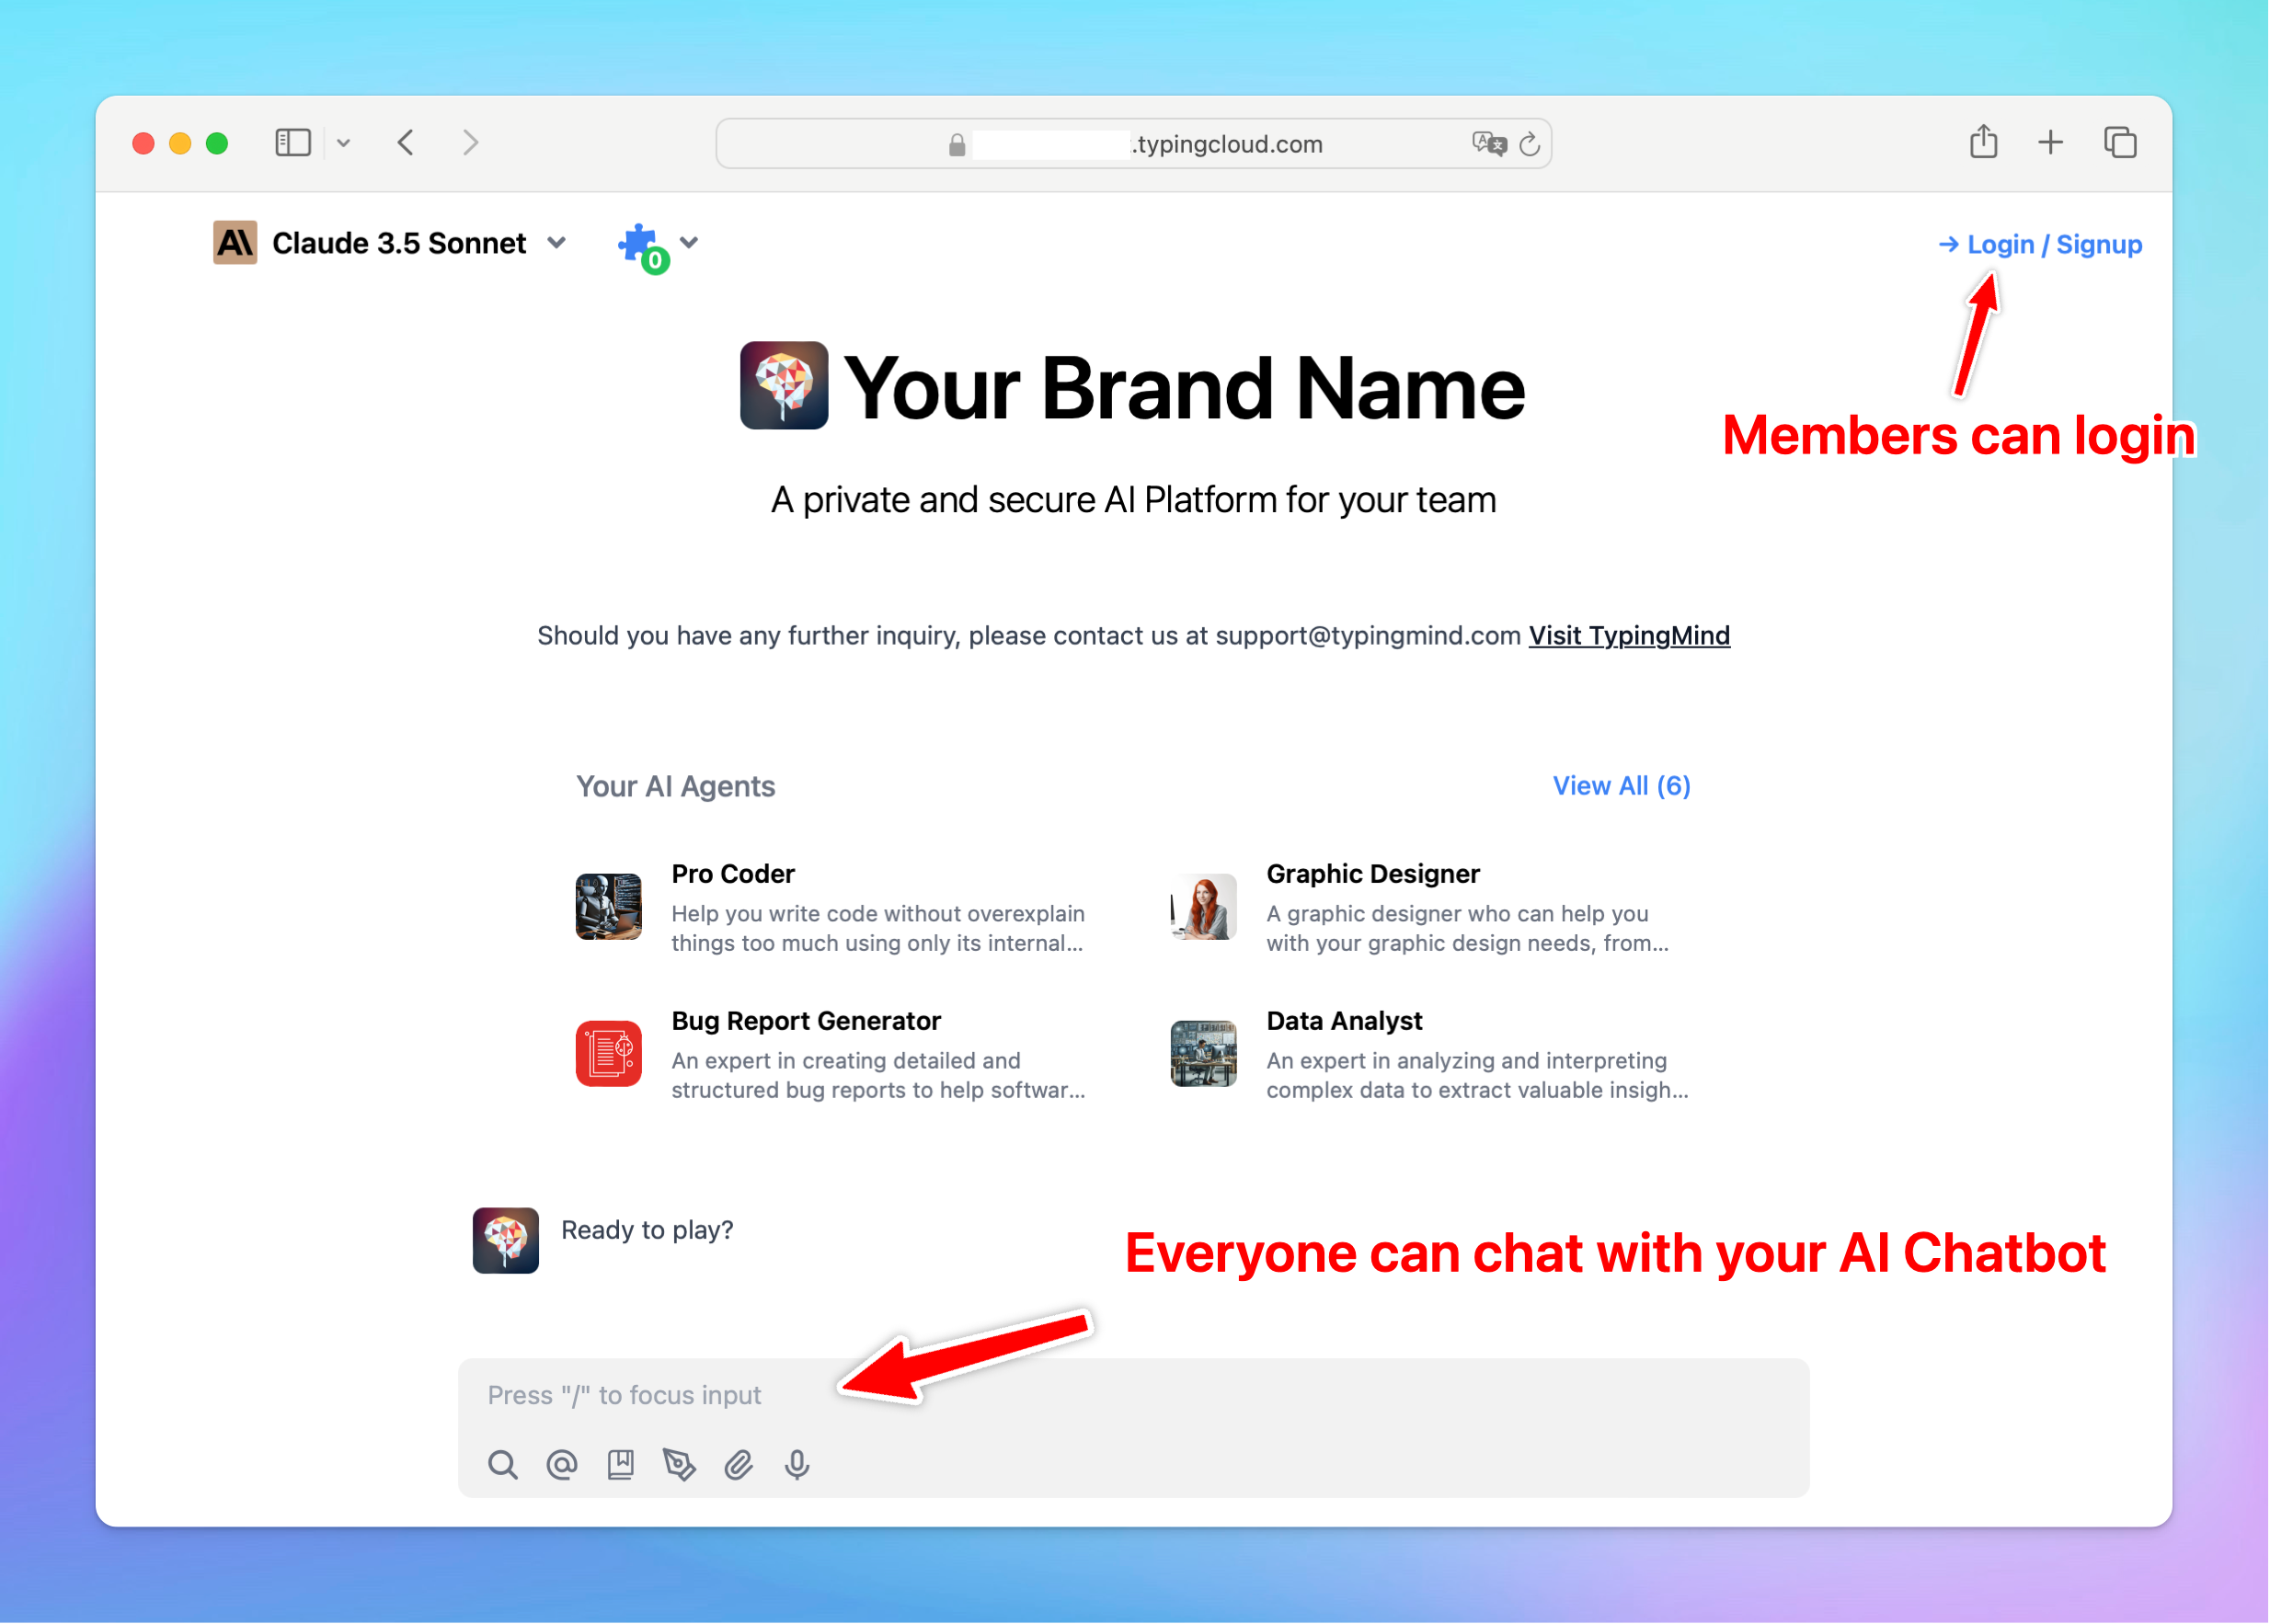
TypingMind allows you to set up tiered access for your AI chat instance, providing you with greater control over Public Mode when opening access for your chatbot. This tiered access system lets you define two interaction levels:
- Public access: your chatbot can be accessed by everyone without requiring a login. Public users can engage in general interactions and access specific resources.
- Sign-in access: for certain user groups, a sign-in is required to access more personalized or advanced features.
Let’s see how to do that!
Why enable Semi-Public Access?
Enabling semi-public access to your AI chatbot is a smart way to balance openness and exclusivity - it lets you serve a wide range of users by offering basic services to everyone while keeping advanced features for those who sign in:
- Reach a wider audience: offer a free trial for visitors and potential customers so they can easily engage in a conversation with the AI model.
- Generate leads: public interactions can be a demo to encourage users to sign up for more advanced features.
- Provide personalized experience: only provide personalized and targeted access for certain groups of users to improve their satisfaction (for example, your loyal customers)
Use cases for Semi-Public Access
1. Customer Support:
- Public users: answer general inquiries, provide product information, or offer basic troubleshooting steps to visitors without requiring them to log in.
- Signed-in users: offer personalized support, such as order tracking, account management, or tailored solutions, for customers who sign in to their accounts.
2. E-commerce websites:
-
Public users: help with general questions about products, store policies, or sales promotions for visitors.
-
Signed-in users: provide a personalized shopping experience with order history, wishlist access, loyal customer offers, and special member-only discounts.
3. Resellers
- Public users: allow basic chat interactions with no access to AI Agents.
- Sign-in users: example limits:
- Basic users: access to 1 AI Agent
- Advanced users: access to 3 AI Agents
- Premium users: access to unlimited AI Agents plus consulting services
More details on Reseller Program
Step-by-step to set up Semi-Public Access on TypingMind
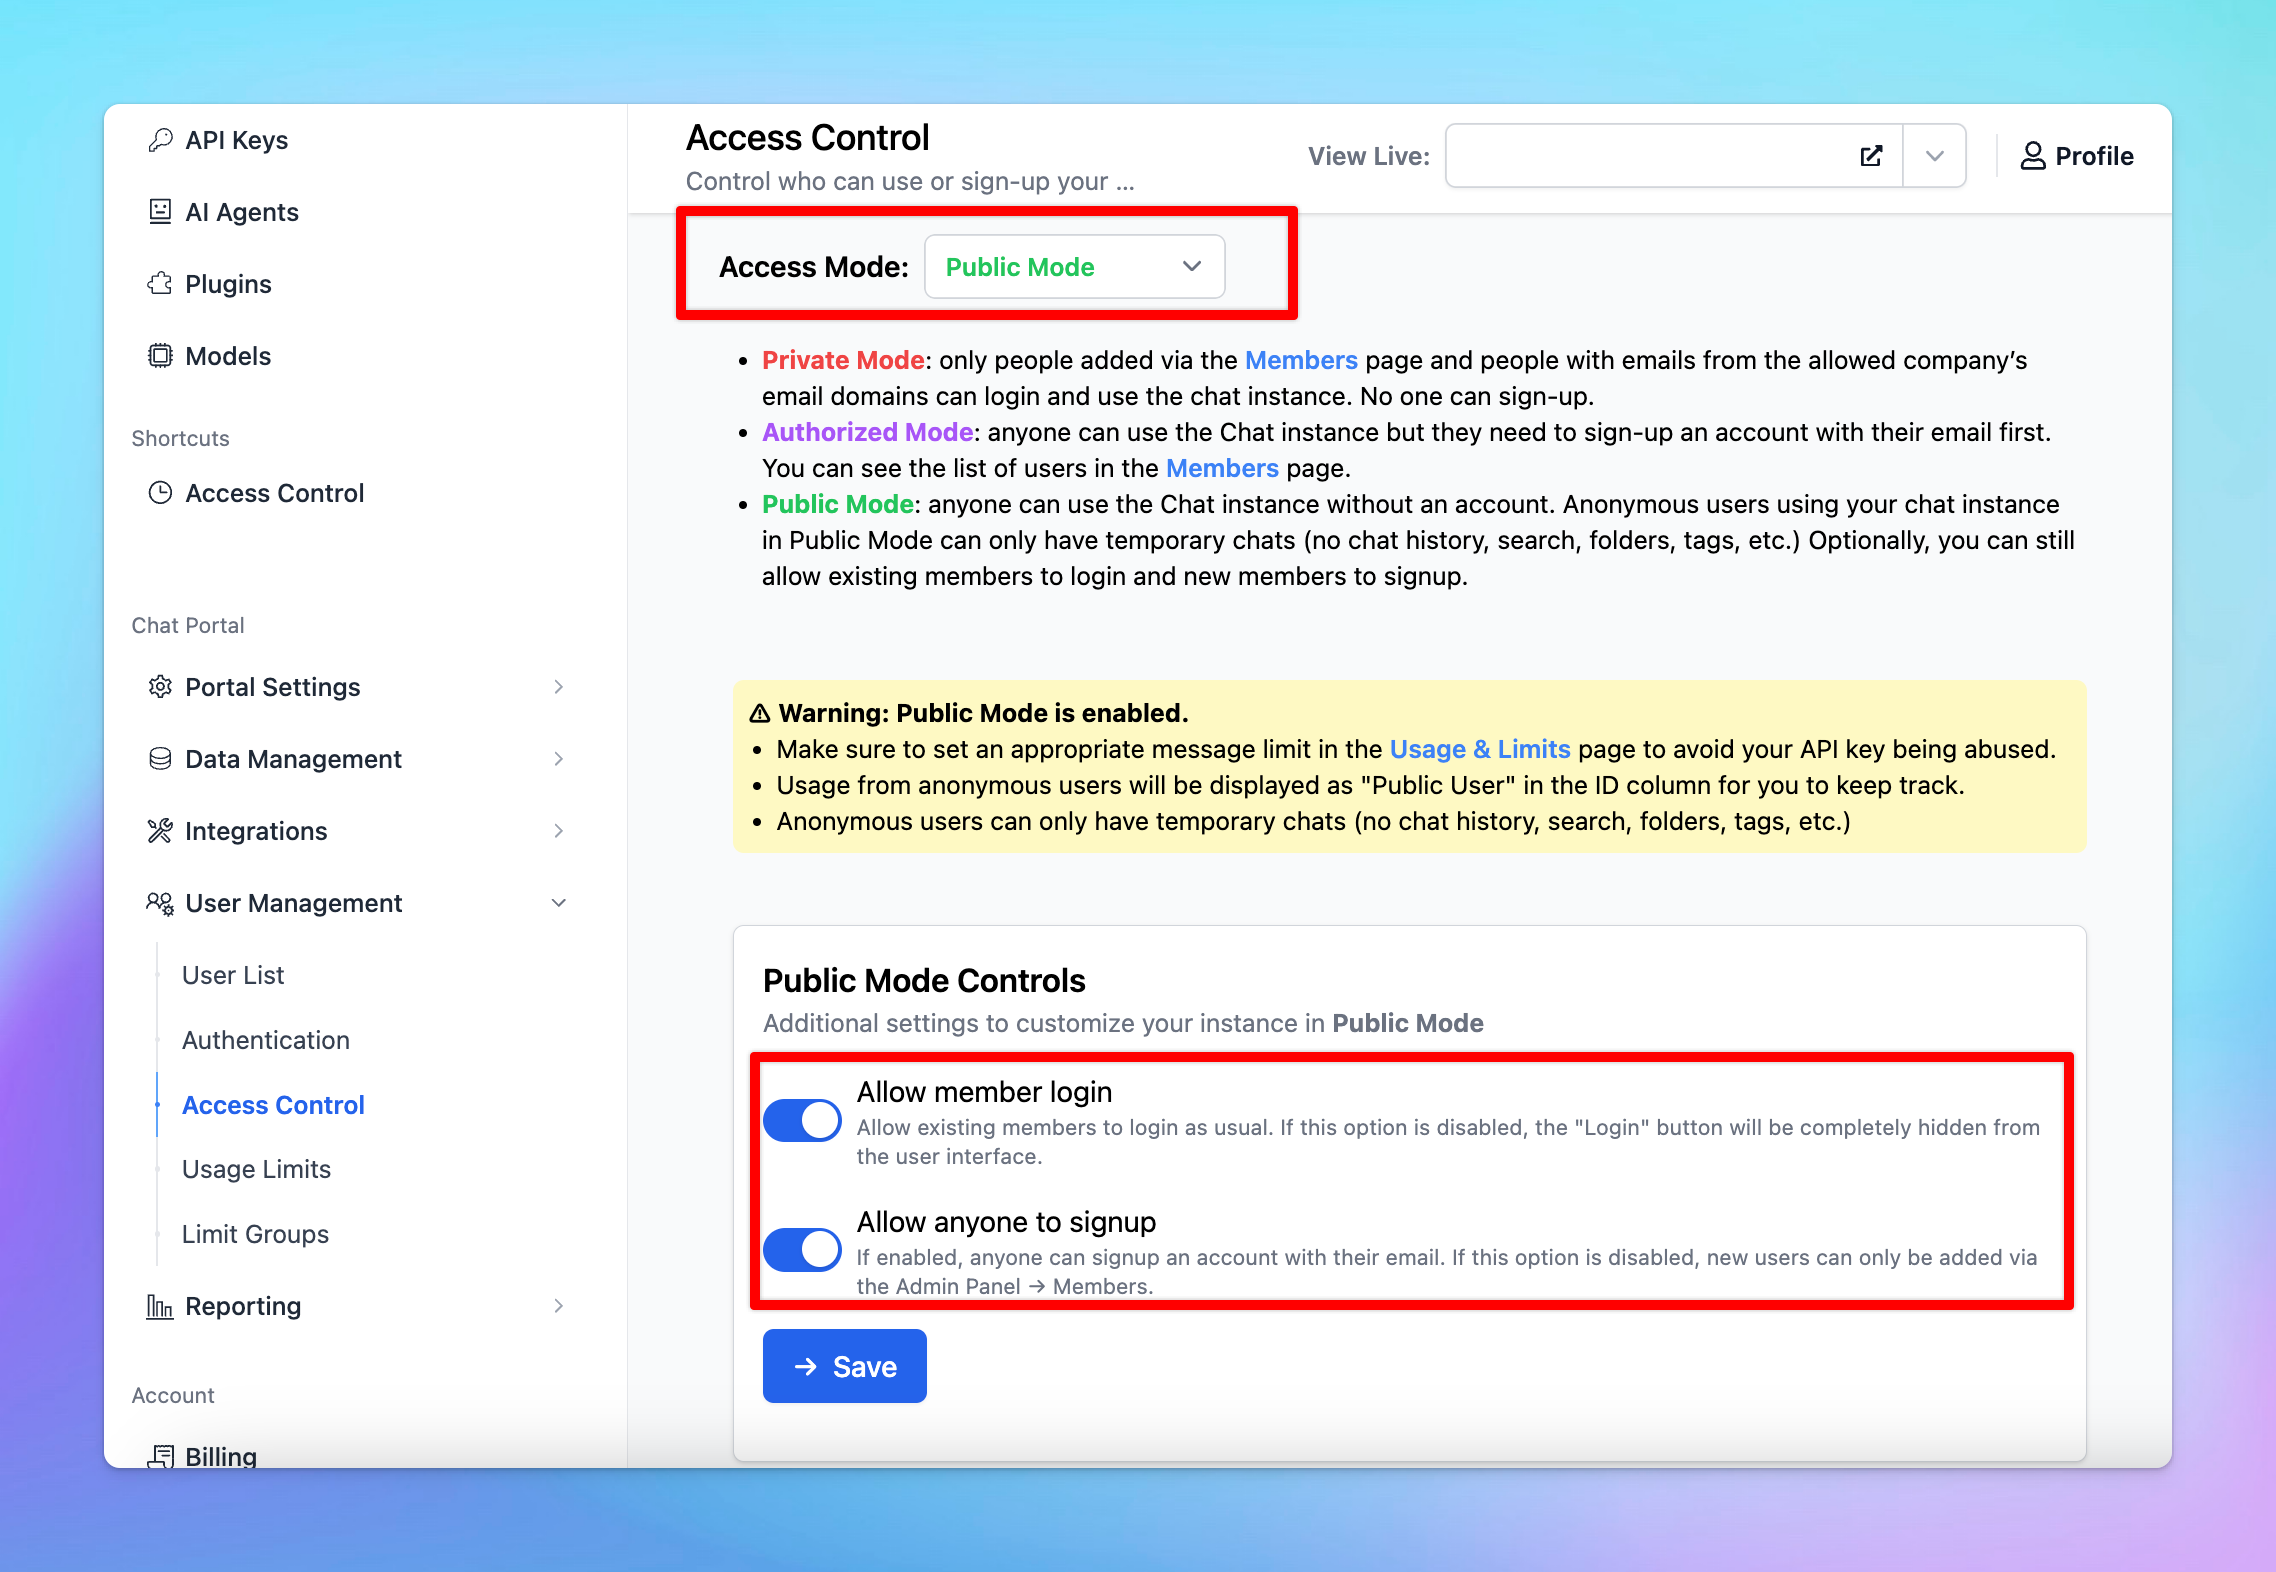
Step 1: Enable Public Mode and Public Mode Controls
- Navigate to Access Control under the Account and Access section.
- Switch the Access Mode to Public Mode.
- In the Public Mode Controls section, enable these two login options:
- Allow Member Login: only invited members can use the "Log-in" option.
- Allow Anyone to Signup: anyone can sign up to your chatbot by providing their email and verifying their credentials.
Step 2: Set up Tiered Access via TypingMind User Group System
Once you enable Public Mode, the system will automatically add a member, “Public User,” to your User list so you can easily control the usage for those who access your chatbot without logging in.
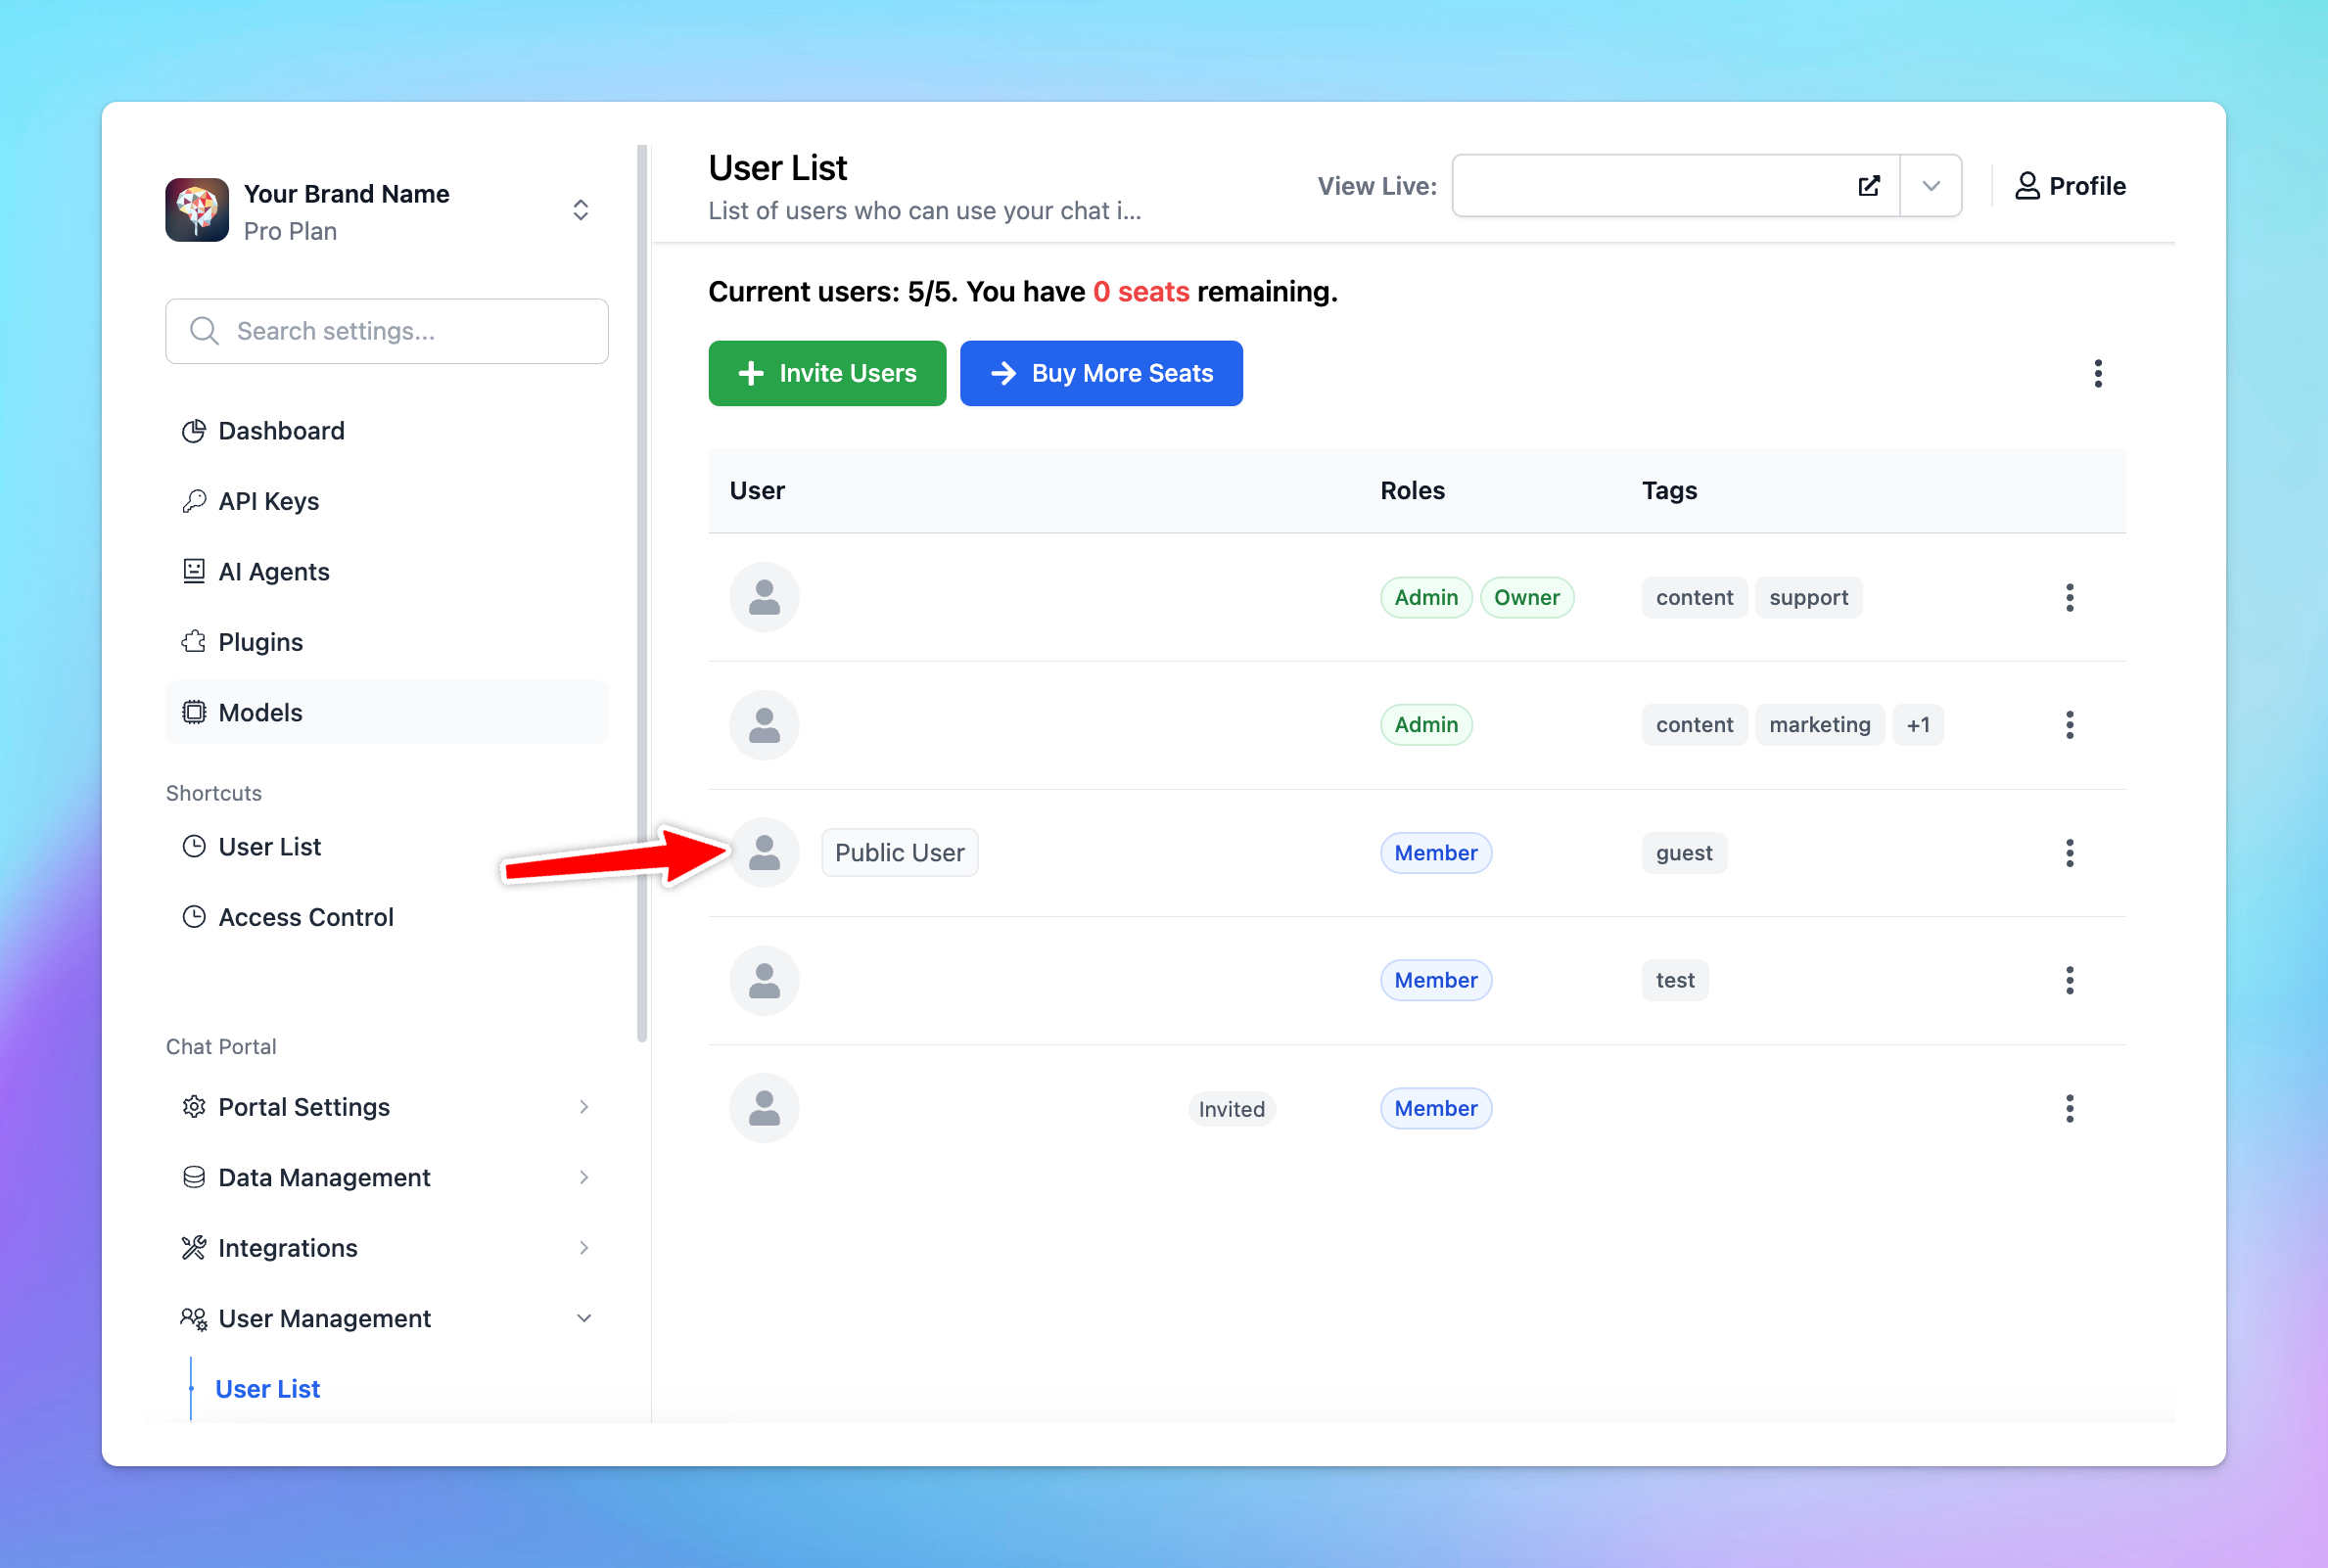
TypingMind allows you to control user usage via a user group system, in which you can add user to a user group and set limits for the user groups you created.
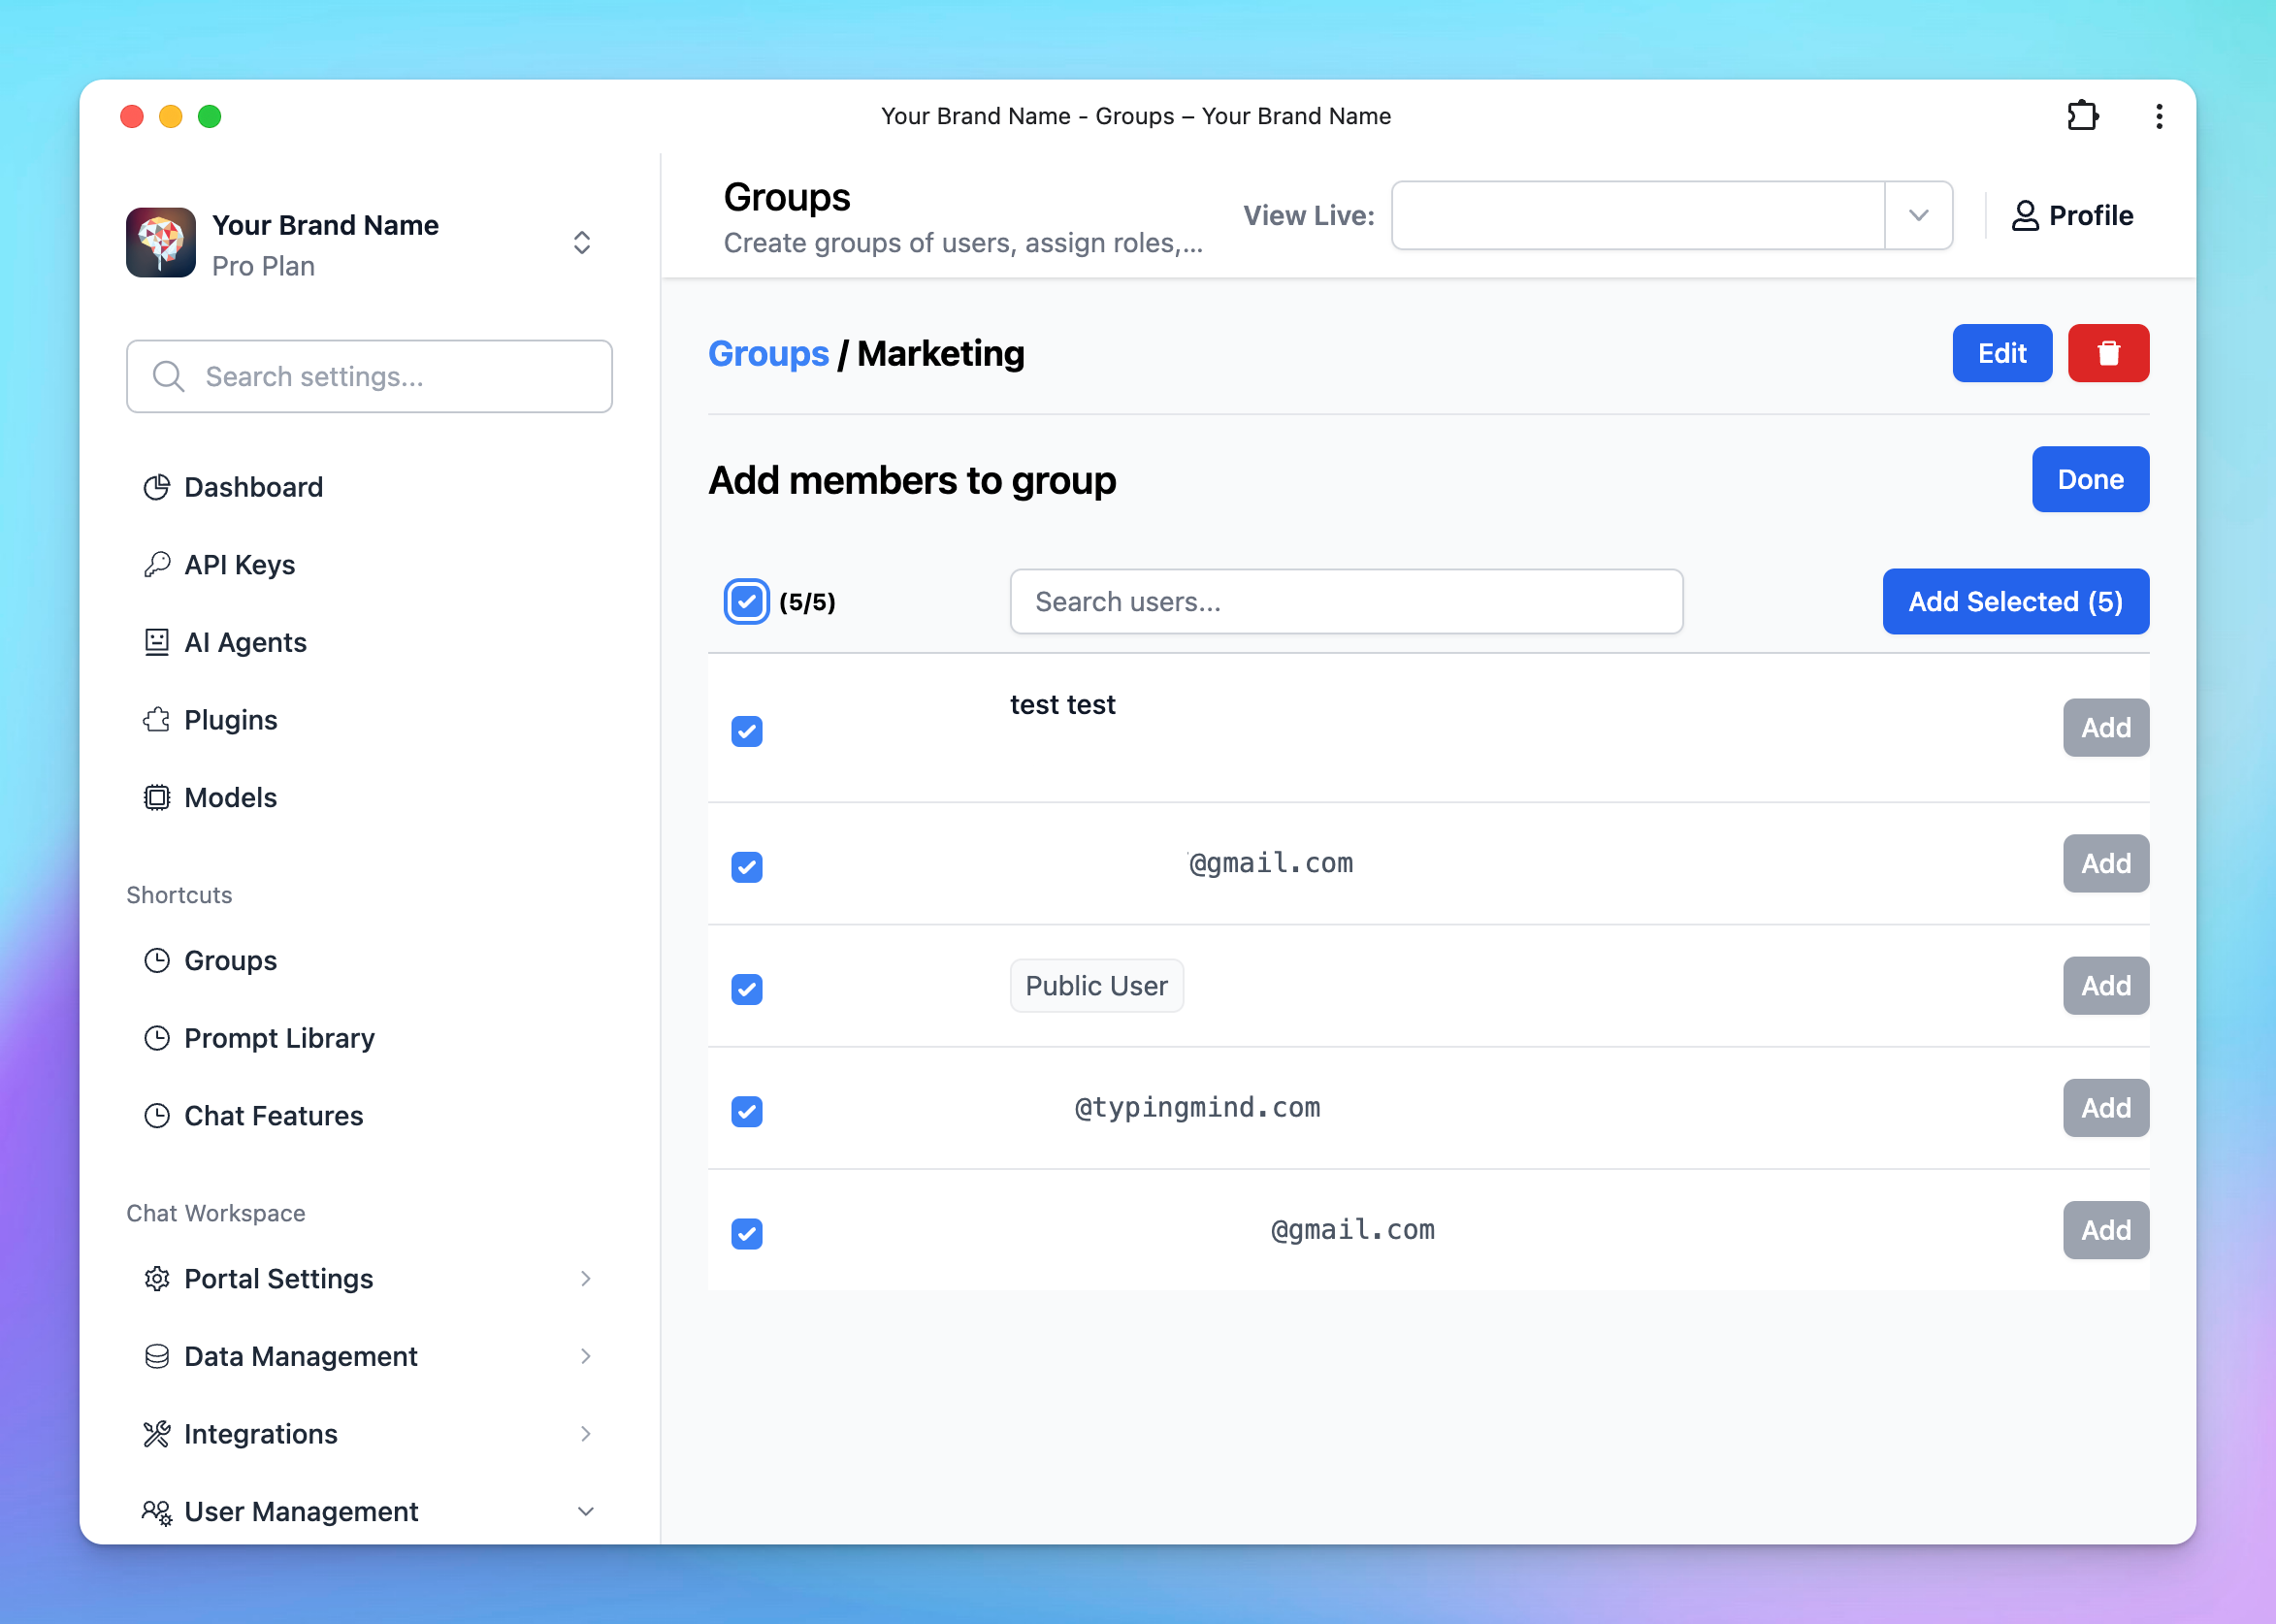
1. Add users to a specific group
- Go to the Admin Panel in your workspace.
- Navigate to the Groups section under User Management.
- Click on Add New Group.
- Click Manage next to the created group
- Click Add Members
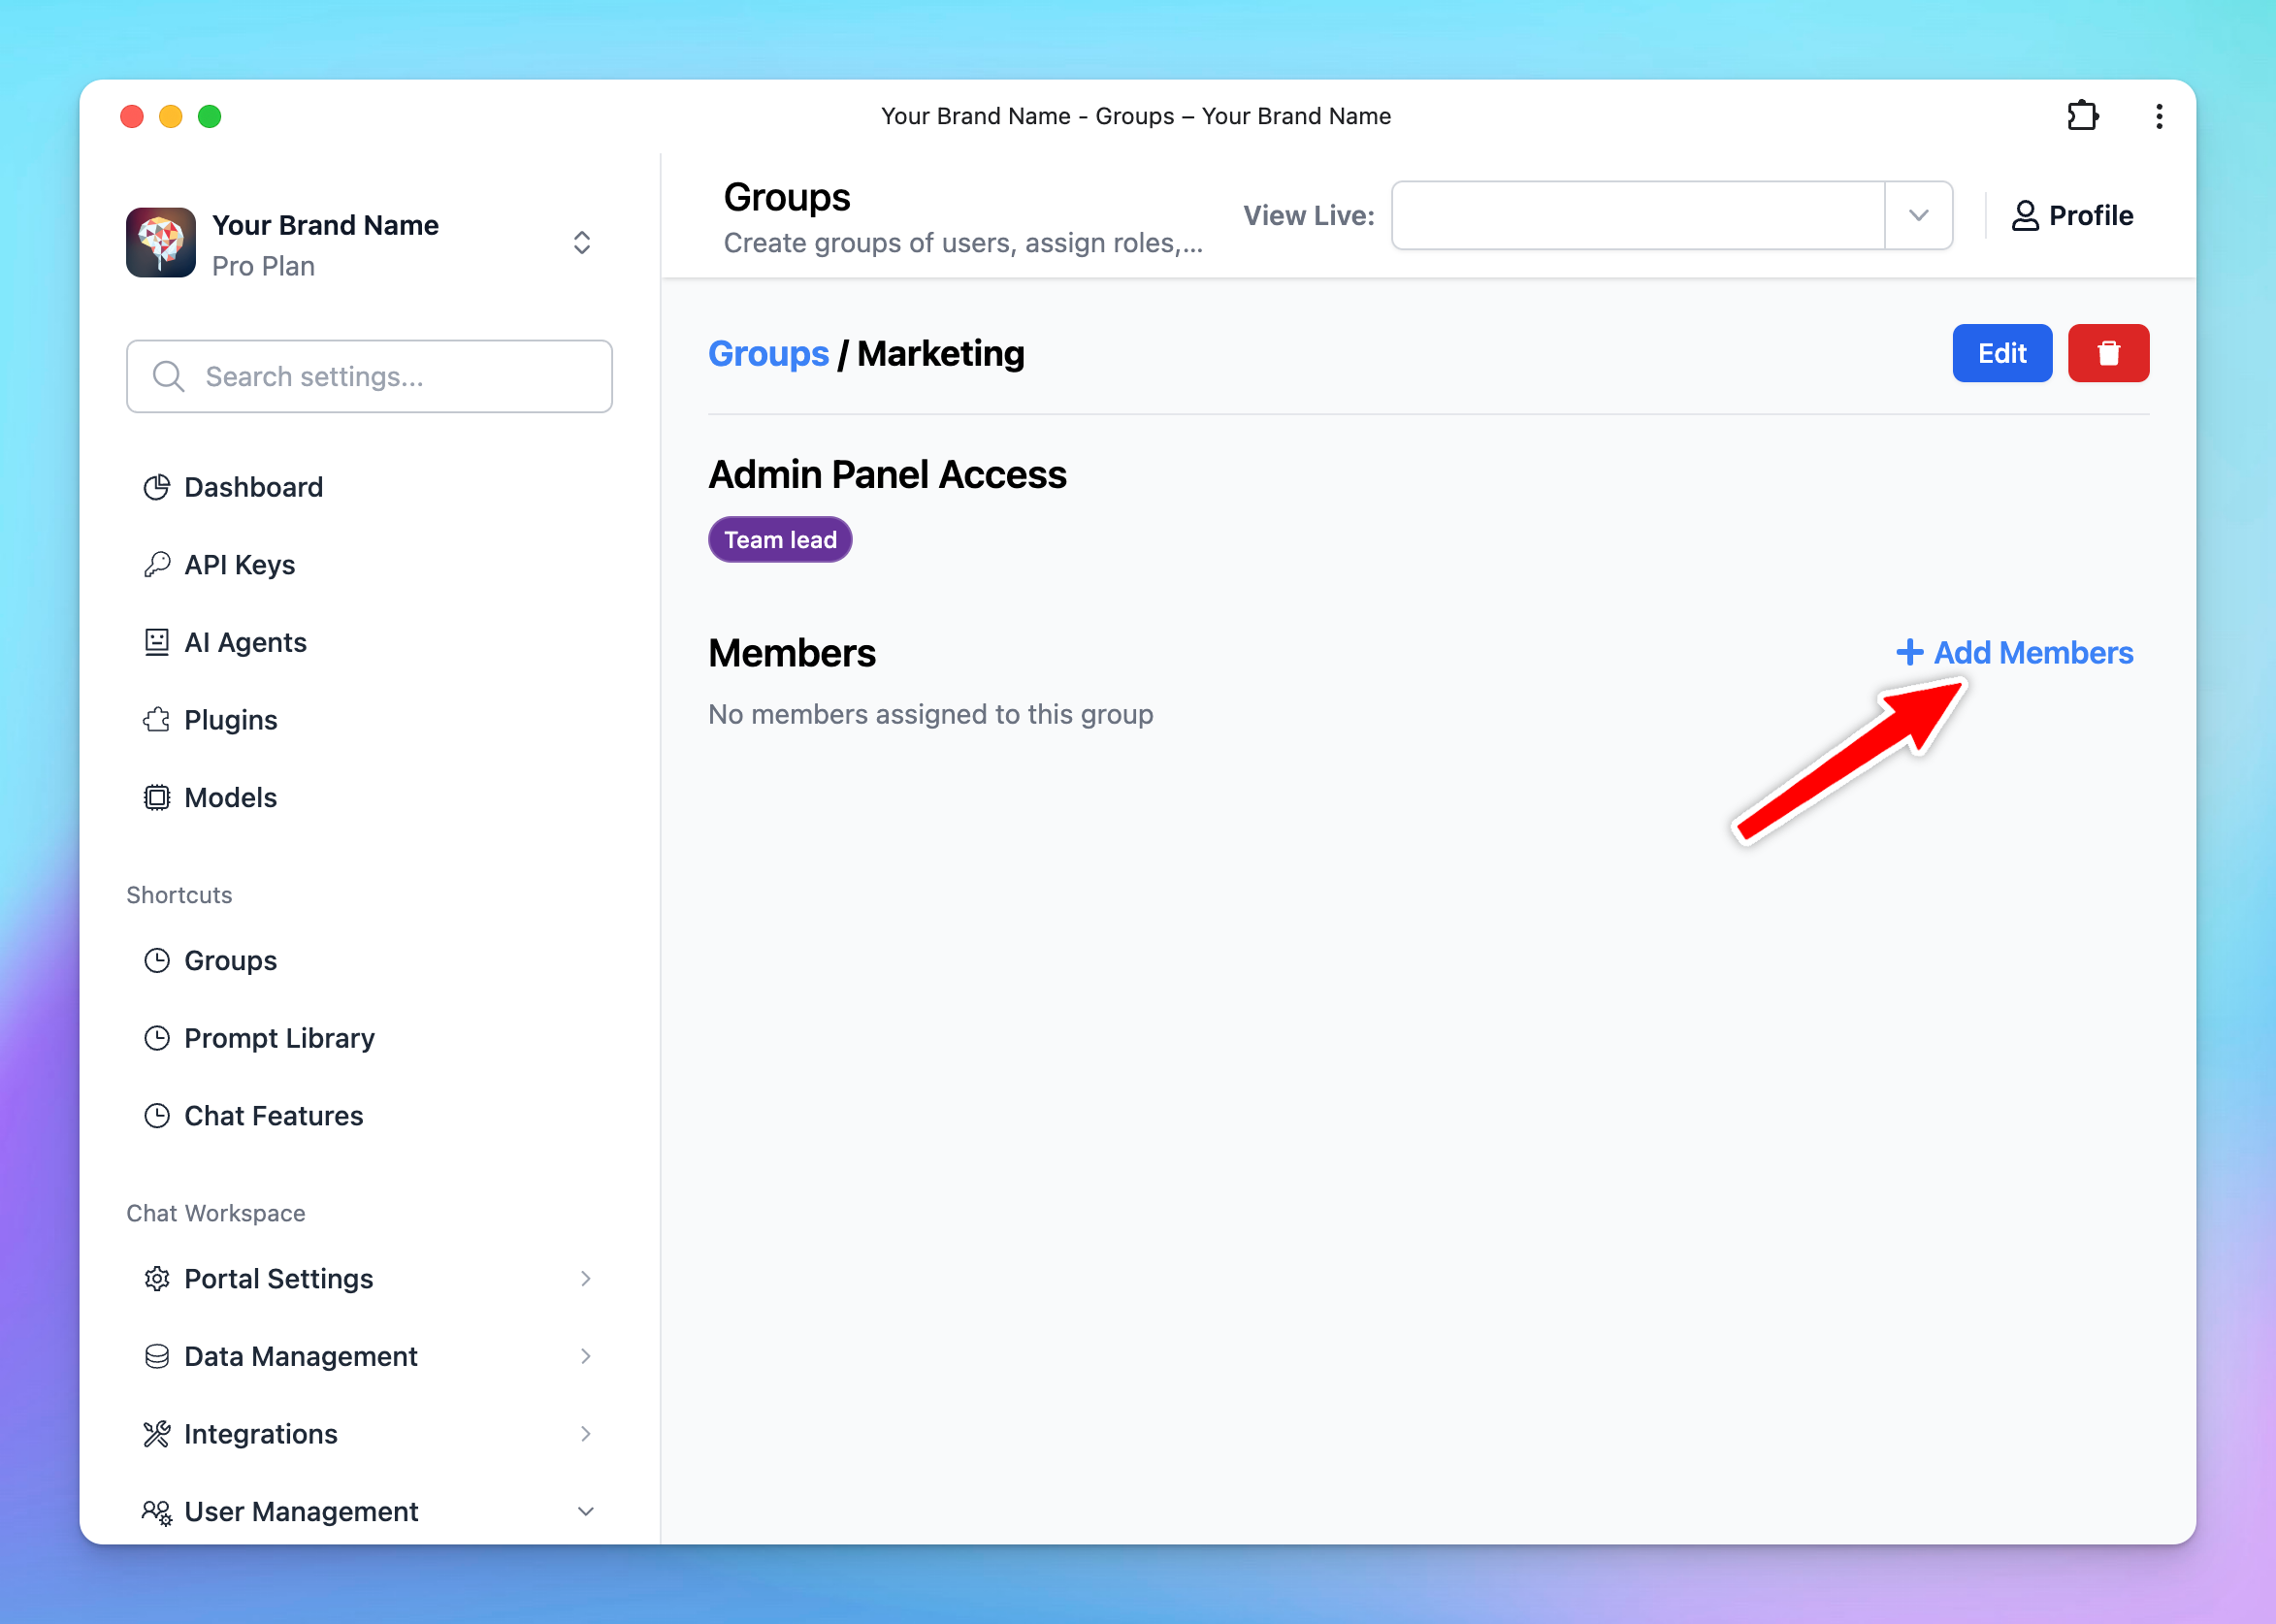
- Select the users / Public user you want to include in this group from the list.
2. Set up limits for each user group
2.1. Create limit group
- Within your Admin Panel, open the User Management menu
- Select Usage Limits and scroll down to Limit Group
- Click on “Add New Group”
- Define the limits for your group by setting:
- Message Limits
- Character Limits Per Message
- Character Limits Per Time Period
For example, you can create different limit groups as follows:
- Guest use: 50 messages can be sent per 3 hours - suitable for users who need minimal interaction with AI, such as those who send fewer messages or shorter content.
- Advanced use: 200 messages can be sent per 3 hours - for users who require extensive AI interactions, allow sending more messages and longer content.
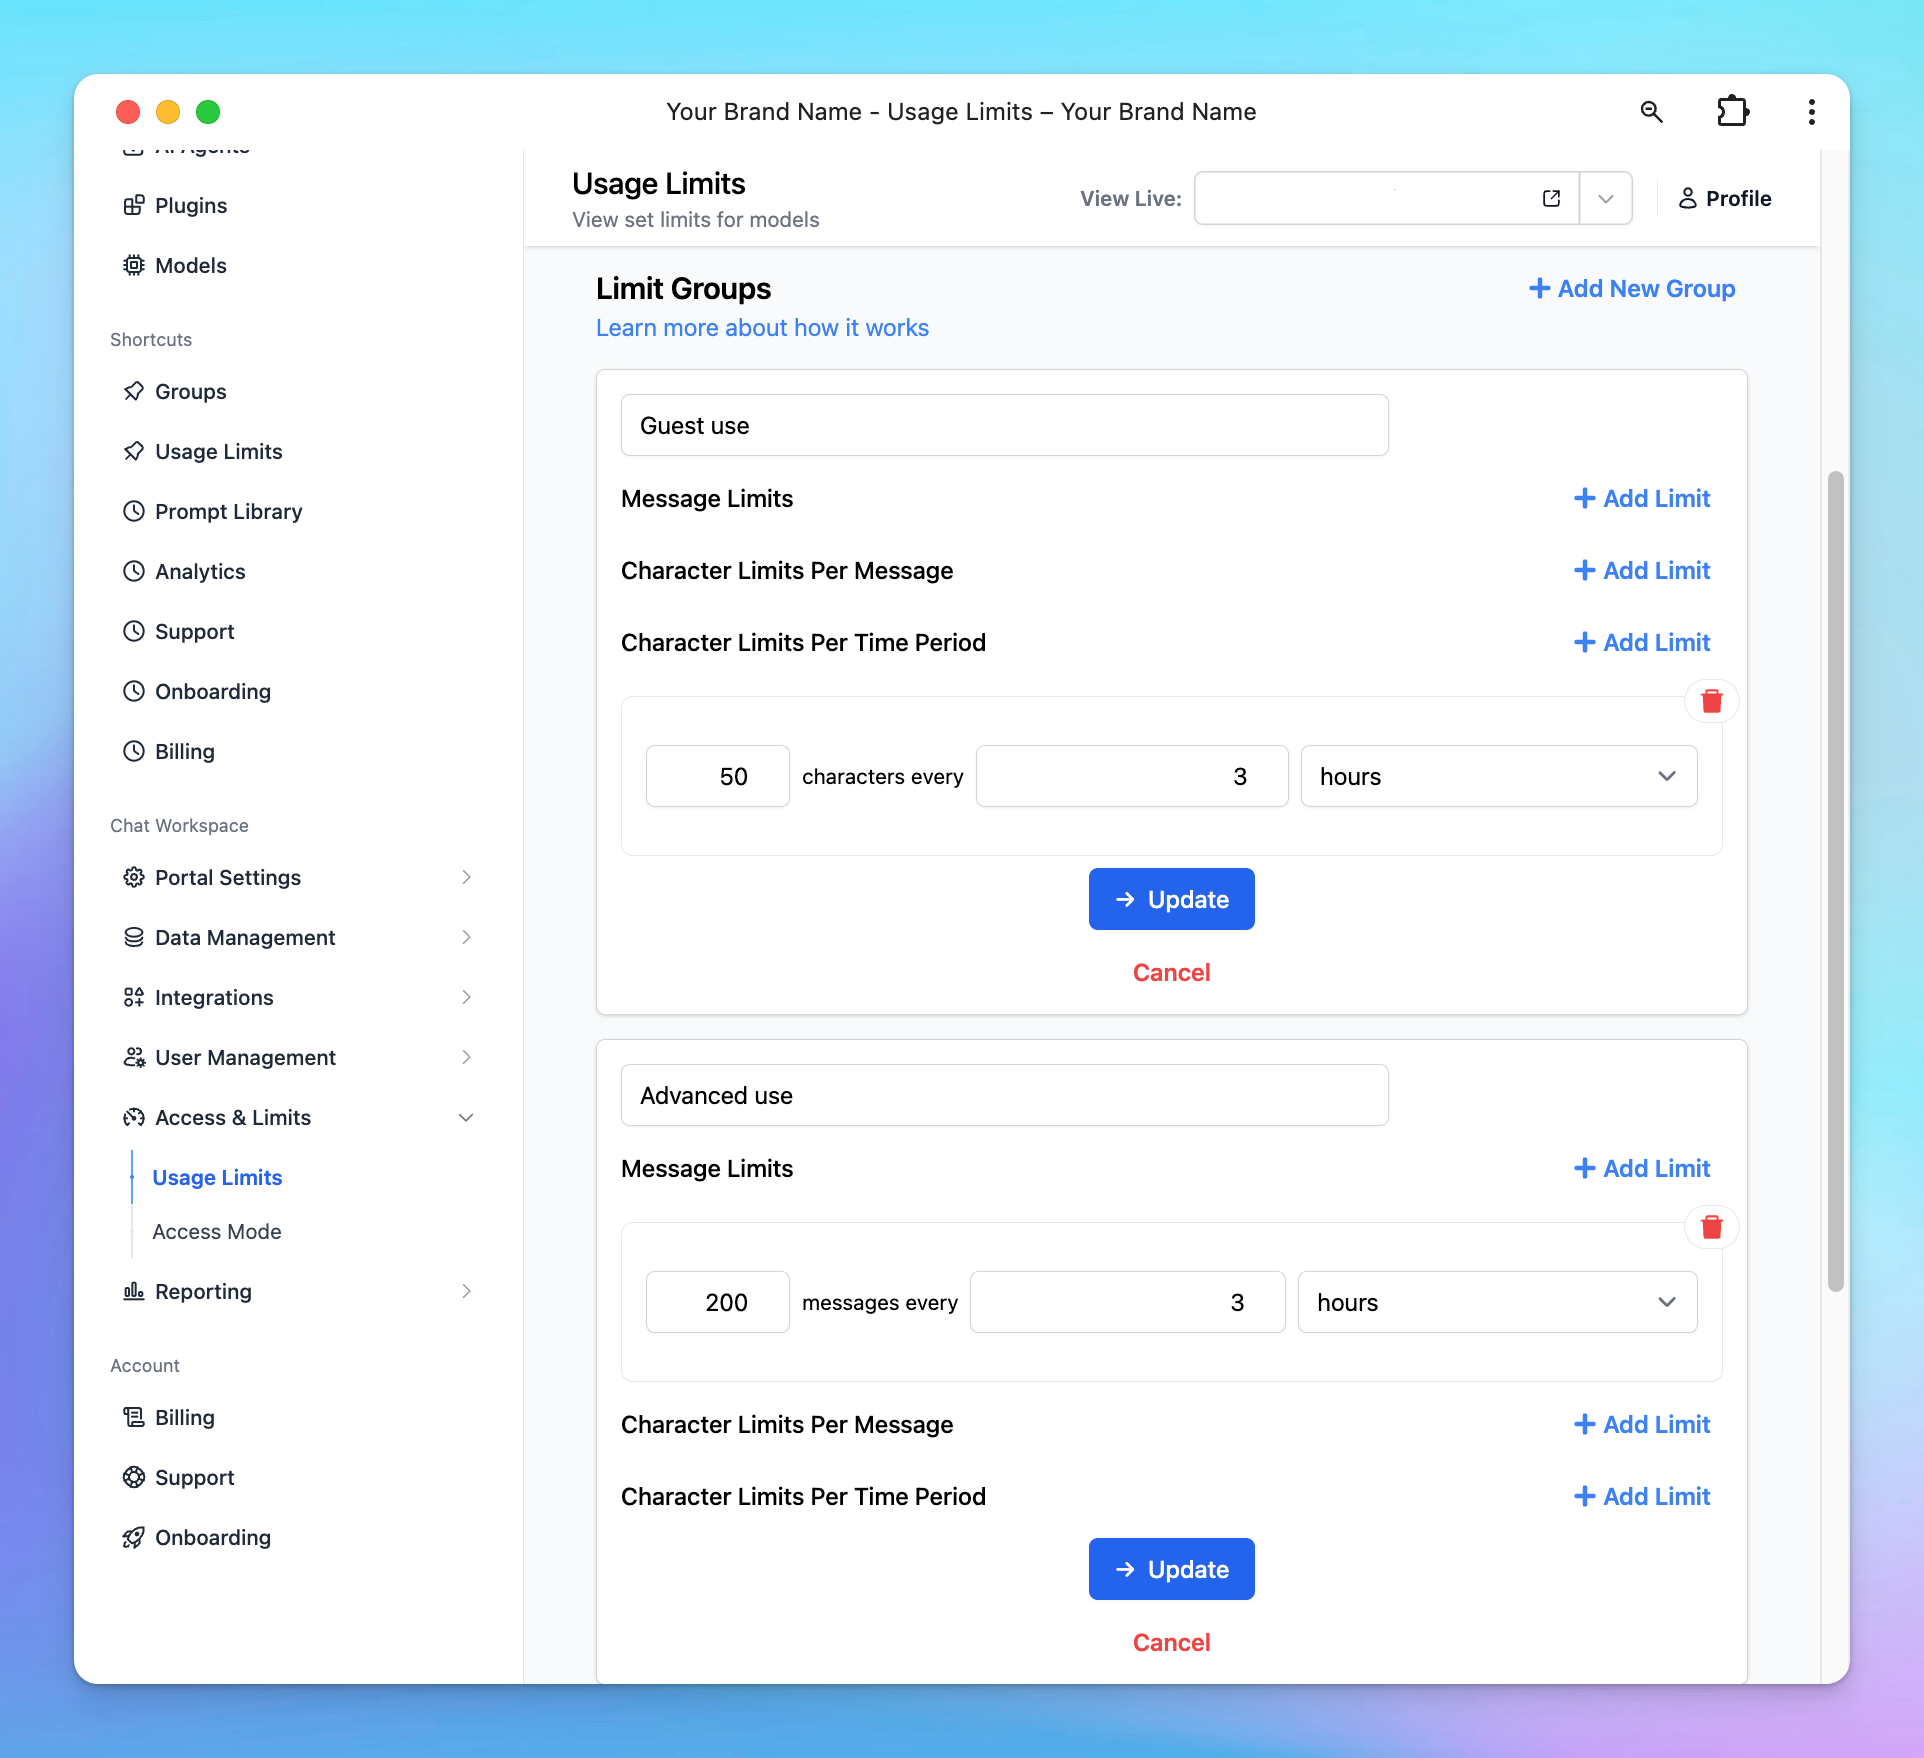
These Limit Groups are reusable, which means once you've created them, you can apply them to different AI Models, AI Agents, or individual Users without needing to redefine the limits each time.
2.2. Apply Usage Limits
Based on different purposes, you can grant log-in members and public users access to different resources:
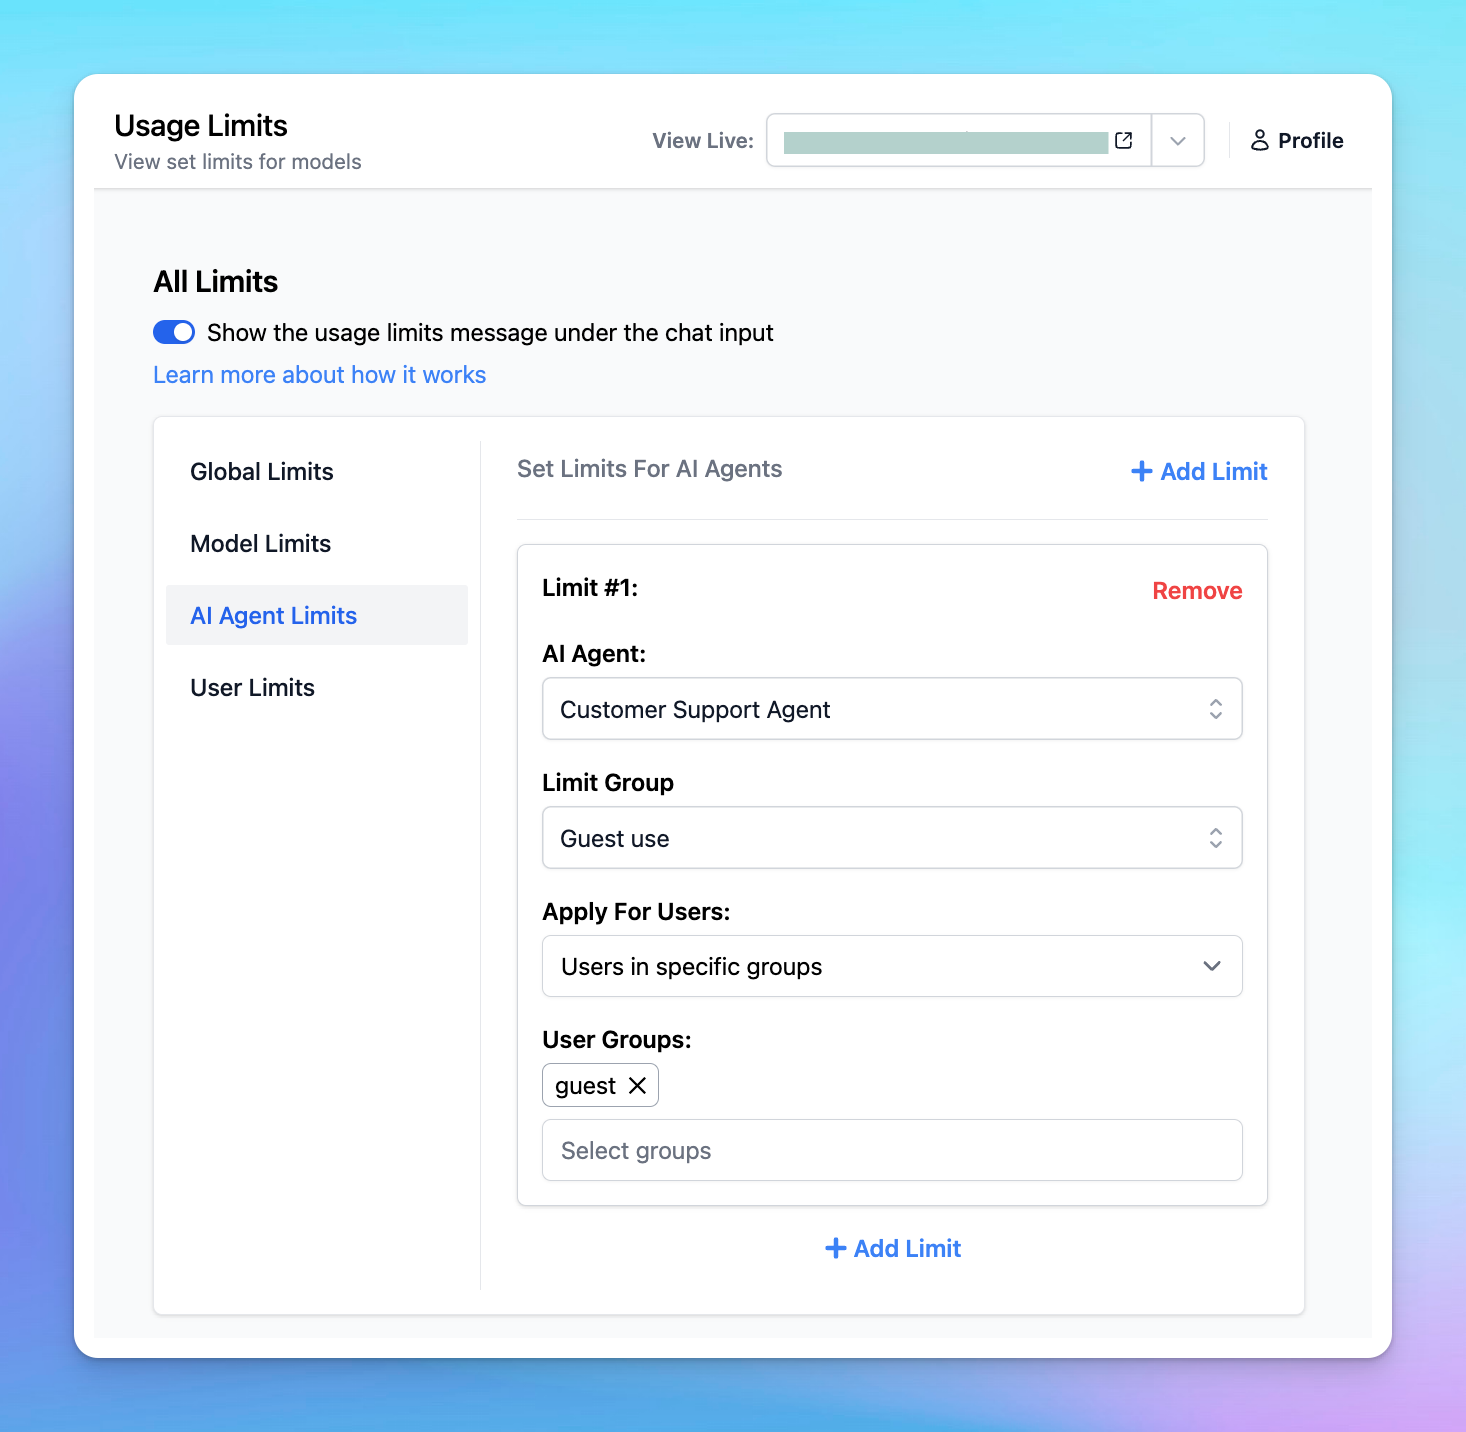
Go to User Management —> Usage Limits to set up the limits.
For example, you can set up limits in such a way that:
- For users with “guest” group, only limiting their access only to the Support AI Agent
- For users with “advanced” group, opening access for “Data Analyst” AI Agent
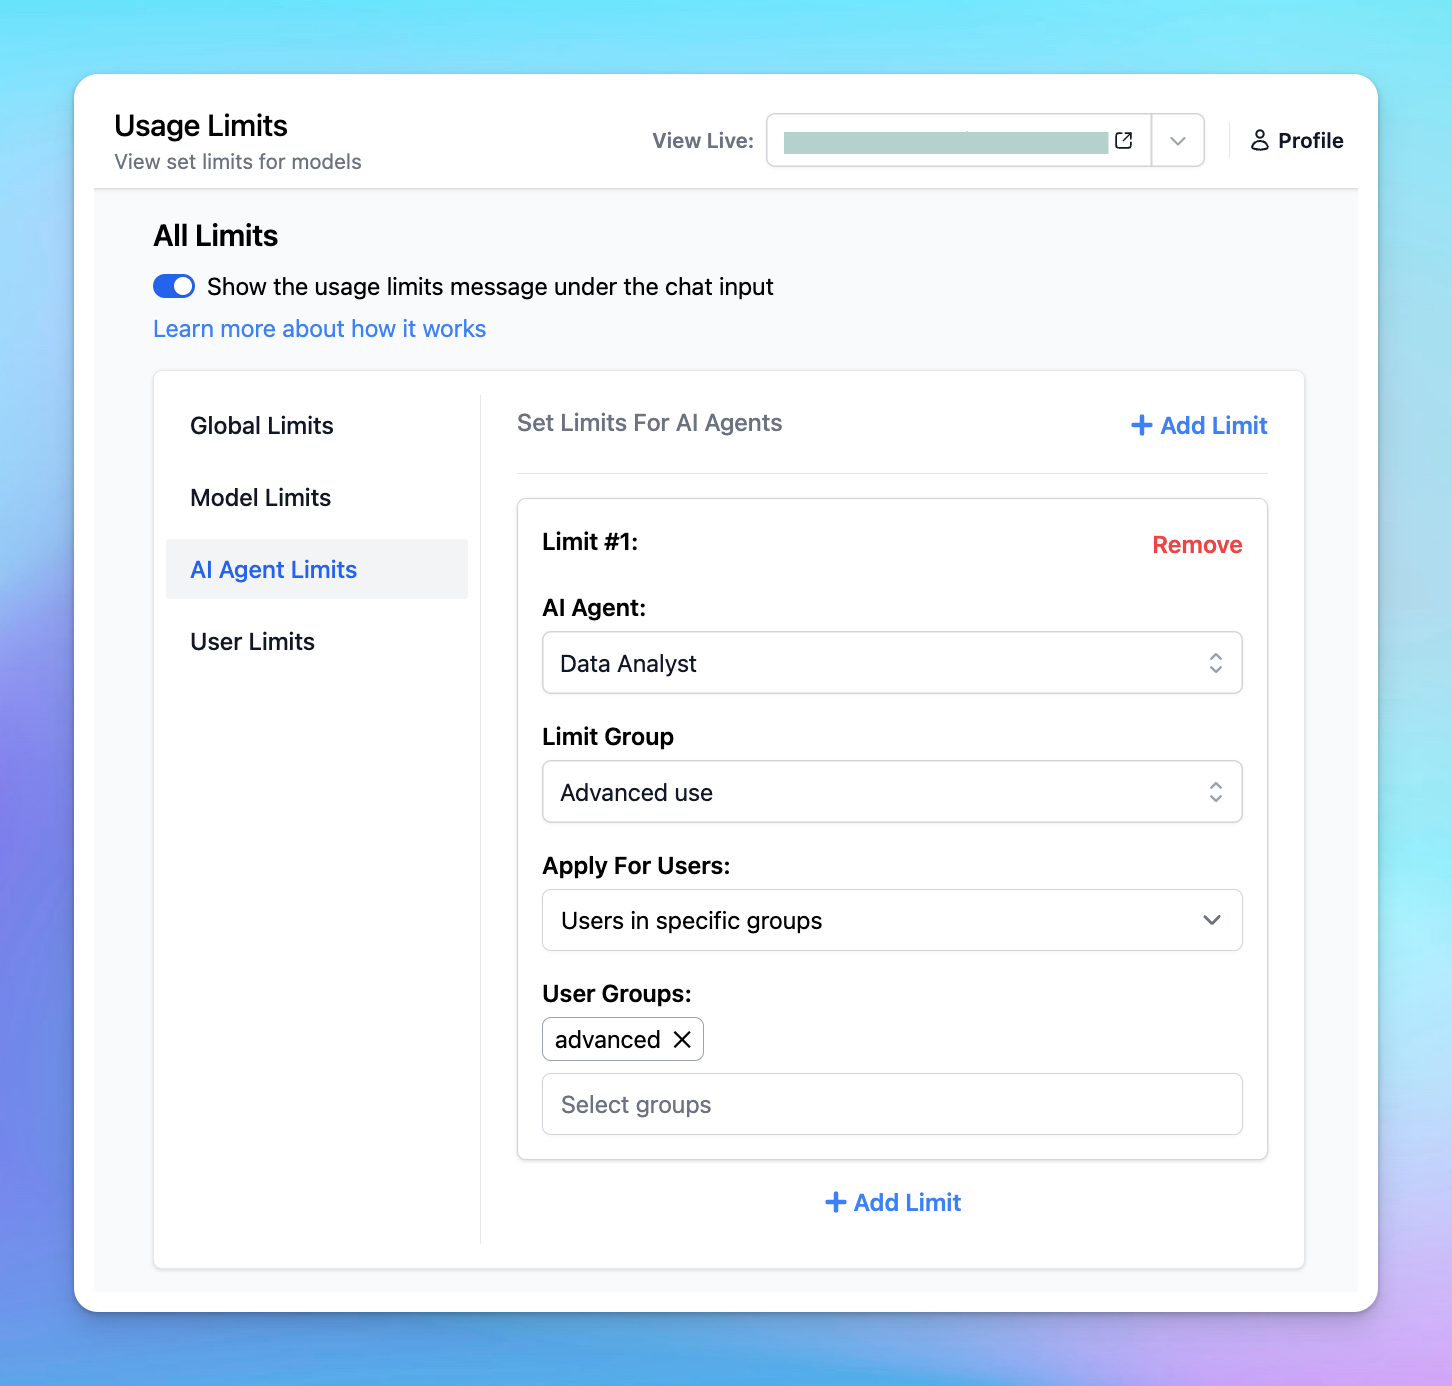
By using these user groups, you can easily control the user experience and resource availability for different types of user groups.
Some Important Notes
- Once you enable Public Mode, the “Public user” will be automatically added to your Member list and counted as one seat - for unlimited access.
- You can’t track the usage or enable chat logs of your public users separately, all of them are anonymous and shown as "Public Users" on the Analytics Dashboard (Reporting -> Analytics)
Bring AI to your team today!


